Morning everyone! It's the weekend!! Later this afternoon, Tyler and I are going to watch City of Bones with some friends, and spend the night to have a BBQ with the same friends tomorrow night :) So, of course, in celebration of watching the movie tonight, I did my nails to match :) I asked on the Facebook page what you guys thought I should do, and Amber-Marie suggested doing some runes on my nails, and linked me this photo. Here is what I came up with ...
Showing posts with label L'Oréal. Show all posts
Friday, 23 August 2013
Tuesday, 11 September 2012
NOTD: Minnie Mouse Nails
I love Disney, who's with me? All of my favourite movies are Disney movies (well except the Twilight Saga and Hunger Games!). I prefer the older/original ones to the newer ones they are releasing today.
After I used Revlon Top Speed Fire I knew I had to do Minnie Mouse nails. I have seen them around Facebook in the last little while and wanted to try them. This was my first attempt, I want to redo these, but I wanted to share them with you before the Challenge begins!
So the reason I want to redo them is because I don't like my bows, and the dots look too busy, to me anyways, but that's my OCD talking. That's the great thing about nail polish is that even if you don't like your first attempt at something, it's easily removable and you can always try again :D
I used L'Oréal I Will! and Jordana Black for the dots and bows.
Do you guys have a favourite Disney character or movie?
Fun facts about my love for Disney:
- My favourite other Disney character is Eeyore.
- My favourite Disney movie is The Lion King, it was the first movie I ever saw in theatres.
- I love Disney because of all the music in the movies, they are all songs that I remember from being a kid and still sing them to myself sometimes :)
- I have the Lion King soundtrack, which was my very first CD.
- Since I have become "older" and have my own income I have started collecting the Disney DVDs :D
- I have been to Disney World probably 5 times. My grandparents have a house an hour from Orlando and we used to visit every other year when I was a kid. My favourite part of the park is watching the parade at the end of the day!
Wednesday, 22 August 2012
NOTD: Back to School Nail Art
Hey everyone! Today I have for you my Back to School nail art for Spicey'z Nails' "Back to School" nail art contest that she is having until September 10. Here is the link to the contest information.
For those of you who follow my page on Facebook, I have been advertising that is is Muffin Nails that is having the contest, but I was wrong. I am so sorry for the confusion! I hope both of these ladies can forgive me for my mistake :(
Ok, now that I have that off my chest and cleared up, onto the nails! :)
I used so many colours for this design I will try to remember them all and list them at the bottom :)
- Thumb nail - apple manicure inspired by cutepolish's tutorial. For this I used Jessica Red Delight, Cherimoya Dark Brown and Julep Courteney.
- Index nail - note paper manicure, I have seen this around the nail community. For this I used L'Oréal I Will! (white), Avon Lagoon (blue) and Jessica Red Delight.
- Middle nail - pencil manicure inspired by Muffin Nails (who said she was going to do pencils, so I came up with this design from her mentioning it). For this I used the tape method to get the point (cut a triangle into a piece of tape and put it on my nail) then painted with Julep Alyson (nude). Then I painted over that with Julep Daisy (yellow) and did the lines with Julep Parker. The lead I did with Jordana Pop Art Black Mark striper polish.
- Ring nail - chalkboard manicure, again I have seen this around the nail community, but with math equations so I thought I would do letters instead :) For this I used Julep Emilie for my chalkboard and Sally Hansen Xtreme Wear Mellow Yellow. I topped it with Essie Matte About You topcoat to give it a matte finish.
- Pinky nail - converse shoe nails, because every good student needs a new pair of shoes to start off a new year :D For this I used Avon Blue Shock, L'Oréal I Will!, Jordana Pop Art Star Designer (silver) and Jordana Black with a toothpick.
Labels:
Avon,
cutepolish,
Jessica,
Jordana,
Julep,
L'Oréal,
nail art,
Spicey'z Nails
Sunday, 19 August 2012
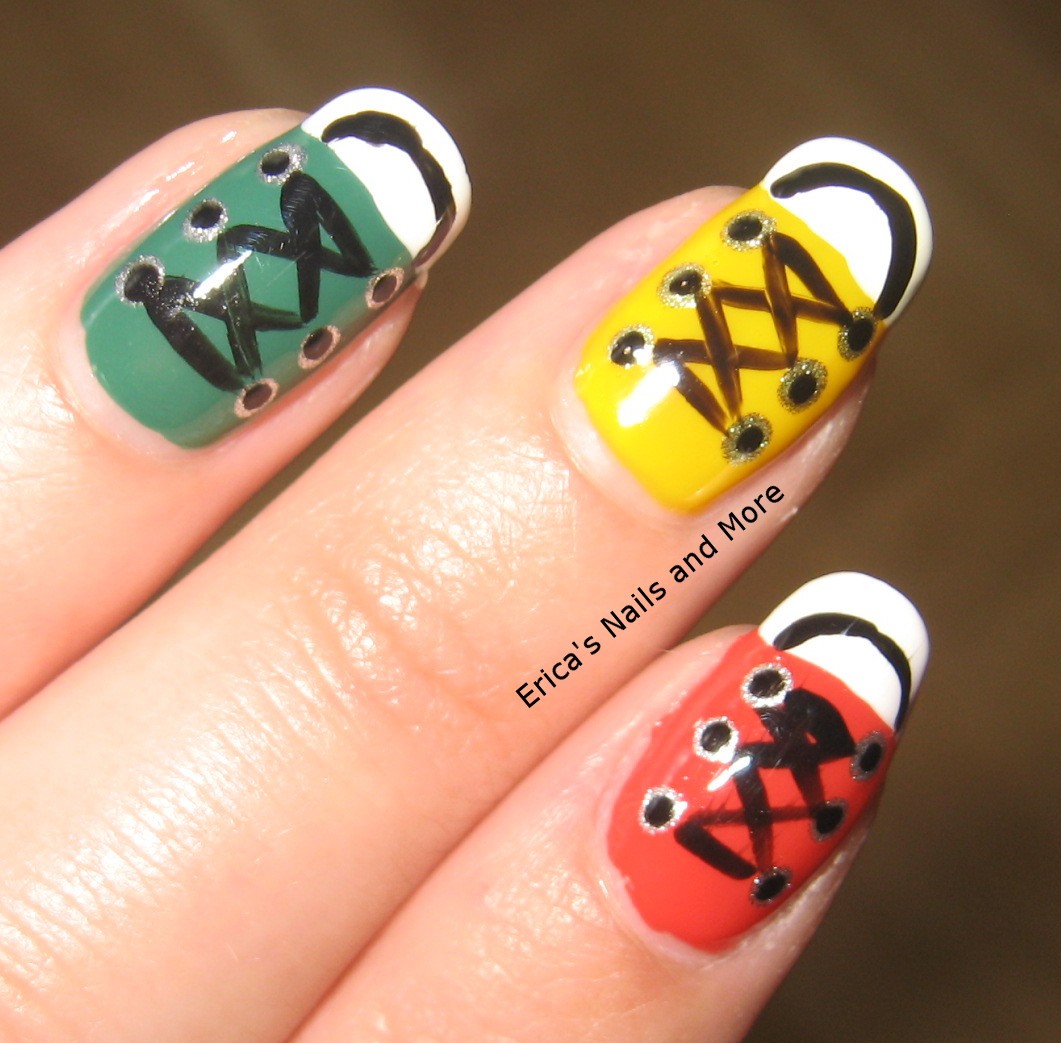
NOTD: Converse Shoe Nails
I hope everyone's enjoyed their weekend so far :)
I have for you today a request sent to me by my cousin on Facebook. I altered it a little bit though. Let's go take a look :)
The inspiration:
This picture is from this blog, though I don't know how to go about finding the actual picture as I can't read the language the blog is in.
So I took this idea and went over to YouTube to cutepolish's channel and found she had a tutorial of a similar design in black and white. I prefered her design to the one shown in the picture so I combined them :D The colour scheme from the picture and the design from cutepolish's tutorial. This is my end result:
The colours I used are:
Thumb -- Julep Eva
Pointer -- Julep Natasha (red-orange)
Middle -- Julep Daisy
Ring -- Julep Emilie
Pinky -- Julep Taylor
White -- L'Oréal I Will!
Black -- Jordana Pop Art Black Mark
Silver -- Sally Hansen Xtreme Wear Celeb City
Have you tried converse shoe nails? Send me a picture by e-mail or share on my Facebook page.
Monday, 30 July 2012
NOTD: Water Marble
Well I made it through today -- how about you guys?
Jill over at Jilltastic Nail Design has weekly nail art challenges on her Facebook page and this week she chose water marbling for her fans. I have tried this technique twice before and have found that it's a very tricky technique and you have to hold your tongue just right in order for it to work ;P I decided I would participate in the challenge so tonight I did some water marbling.
First, I painted my nails white with L'Oréal I Will! so that the colours I used to water marble would pop! Then did my water marbling with Jessica Black, Avon Loving Lavender and Aqua Fantasy. I LOVE the way this turned out even though there were some spots where I mis-aimed and didn't get any design on my nails but that's OK because the white adds extra character with the unique designs :)
So what do you think?? Have you tried water marble nail art? Share pictures with us on my Facebook page!
Some tips and tricks --
- Use room temperature bottled water, not tap water
- I use a plastic shot glass (Jell-o shooter glass) that I got at my local dollar store
- Apply chapstick on the skin around your nail and up your finger so that when you dip your nail into the water and polish it is much easier to remove the polish that gets on your skin.
- Check out these videos to get a visual on how to accompish this technique -- Jilltastic Nail Design and cutepolish
The thing I like about water marbling is that every nail looks different :)
Saturday, 28 July 2012
NOTD: Get a Life! ;)
Hey everybody! I hope everyone is enjoying their weekend so far :)
I have for you today the nail art I was going to do on Thursday but due to nail staining (which is still there) I put it off, but decided to do it anyways. This is for all you video-game junkies out there!
I was able to cover the staining with white polish, then added a nude sheer to it to give it an almost natural nail look. It's a lot better than what this design would have looked like without the white coat because my green stained nails would have been peeking through the design.
Anyways, without further ado, here is what I have for you today. I saw this nail tutorial on cutepolish's YouTube channel and just had to try it!
This was a little more difficult than it looked in the video, but I used the nail polish brush rather than a smaller art brush, so that made it a little trickier. Next time I would definitely use a smaller art brush.
I also knicked my thumb nail while I was waiting for the nude colour to dry, so please ignore that :)
So the colours I used -- Avon Electric Green, L'Oréal I Will, Jordana Pop Art Black and Sally Hansen Nearl Nude Natural Colour from a French Tip kit. In the sunlight pictures you can see the shimmer of the nude colour, it's very pretty on its own too :)
What do you guys think? I would also like to try the design with red for the "grow-up" mushrooms from Super Mario Bros. Super Mario Bros. is my favourite video game, but I don't know all the "technical" terms for the magic mushrooms in the game :P
So the next time your boyfriend or husband tells you to "get a life" because you paint your nails too often, paint this for him then see what he has to say ;D
Thursday, 26 July 2012
NOTD: L'Oréal Mango-Get-Em
Hey everybody! Wow, I have to get my blogs done earlier, lol!
So I had an awesome nail art planned for today, but when I took off Julep Emilie tonight, this is what my nails looked like :'(
The glitter came off great wih the tinfoil method (see Ms. Lizard's tutorial), but I was left with a mess of a stain on my nails, even though I put a base coat on :( This happened the last time I wore Emilie too. Guess I will have to try to put a couple coats under the colour to try to prevent the staining...
Anyways, so because I figured I should put an opaque polish on to cover the staining rather than the nail art I was going to do, I put on L'Oréal Mango-Get-Em. Then, to dress it up without going too overboard, I did a couple polka-dot flowers on my thumb and ring finger as accent nails.
L'Oréal Mango-Get-Em is a really pretty pinky-coral colour. I had to put on 3 coats, but that was mostly because you could still see the green stain underneath. I got this colour a few years ago because I thought it would match a coral dress I was going to wear to my cousin's wedding. Turns out the dress was more orange-coral and the polish more pink-coral, so they didn't match, and the dress didn't fit anymore :(
What do you do when your nail polish has stained your nails? Ms. Lizard also has a nail whitening tutorial but I didn't have time to do it tonight and do a blog post. I did soak my nails in a bowl with warm water and lemon juice to try to make the stain a little lighter. It helped a little bit, but they are still fairly green under my new polish colour. I hope it comes off with the next polish change.
Monday, 16 July 2012
NOTD: Double Polka Dots
Happy Monday gang! I hope everyone made it through today unscathed :D It's excessively hot here in Ontario and tomorrow's only going to be worse, so they say :( I hate summer - maybe this will be a good time to do a winter manicure ;D
I thought I would use some colours today that I hadn't used in a little while for some simple nail art :)
I used Avon Loving Lavender (purple), Revlon Top Speed Jaded (green) and L'Oréal I Will (white) for this double polka dot manicure. This was a really easy manicure to do and if you love polka dot manicures I would recommend trying it.
For the large white dots I used a "tailor's pin" stuck in the eraser of a pencil for a dotting tool, and then for the smaller dots on top of the white dots, I opened up a paperclip and used that.
Just place the large dots wherever you like, there is no rhyme or reason to the placement, and then dot the opposite colour on top of the white dots. I chose to do accent nails on my ring finger and thumb, but you can do all your nails the same base colour with the same centre/small polka dot colour if you like!
If you try this kind of manicure, share it with me on my Facebook page, I would love to see it :D
Friday, 13 July 2012
NOTD: Tie Dye & Peace Nail Art
Happy Friday the 13th! I'm not superstitious, but I had a bad experience on a Friday the 13th a couple of years ago that made me hate this day and I don't go anywhere unless absolutely necessary! What about you, are you superstitious of Friday the 13th?
Tyler and I are helping my friend and her husband move to their new house tomorrow and she's a hippie at heart. When I saw this type of nail design on Lacquered Love's Facebook page I knew I had to try it out for when I help them move :D
I looked up a lot of ways to create tie dye nails, and found a video on YouTube using seran wrap to create the tie dye effect. So I painted my nails white and tried it out - this is the result.
I was never into the tie dyed clothing fad, and I have never made anything tie dyed, but I think this turned out pretty awesome :D I'm pretty darn proud of myself on this one. It turned out excellent for a first attempt :D
So then, following my inspiration photo, I added peace signs to each nail with a white nail art pen.
I think these nails are pretty sweet! I'm so happy with the way they turned out, and will definitely be creating tie dye nails again :D
The colours I used are:
L'Oreal I Will white base, Jessica Red Delight, Julep Courteney, Avon Blue Shock, and Sally Hansen Xtreme Wear Mellow Yellow. The peace signs were done with Sally Hansen Nail Art Pen in White.
What do you guys think?
Tyler and I are helping my friend and her husband move to their new house tomorrow and she's a hippie at heart. When I saw this type of nail design on Lacquered Love's Facebook page I knew I had to try it out for when I help them move :D
I looked up a lot of ways to create tie dye nails, and found a video on YouTube using seran wrap to create the tie dye effect. So I painted my nails white and tried it out - this is the result.
I was never into the tie dyed clothing fad, and I have never made anything tie dyed, but I think this turned out pretty awesome :D I'm pretty darn proud of myself on this one. It turned out excellent for a first attempt :D
So then, following my inspiration photo, I added peace signs to each nail with a white nail art pen.
I think these nails are pretty sweet! I'm so happy with the way they turned out, and will definitely be creating tie dye nails again :D
The colours I used are:
L'Oreal I Will white base, Jessica Red Delight, Julep Courteney, Avon Blue Shock, and Sally Hansen Xtreme Wear Mellow Yellow. The peace signs were done with Sally Hansen Nail Art Pen in White.
What do you guys think?
Subscribe to:
Posts (Atom)